


Teachers need a Jamboard replacement because the platform was officially shut down in late 2024. The best replacements—including Miro, FigJam, and Lucidspark—offer superior collaborative features and better APIs for tools like Gimkit. For true Gimkit interactive whiteboard integration, platforms with robust real-time collaboration tools are essential for recreating the high-engagement learning experience.
The Jamboard Countdown: Why Teachers Need a Digital Whiteboard for Classroom Now
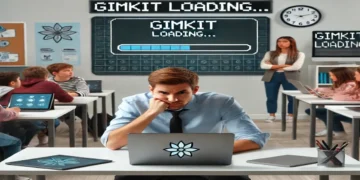
The clock has run out. If you’re one of the millions of educators who relied on Google Jamboard for your daily dose of collaborative brainstorming, the transition to a new tool is now a critical priority. Jamboard’s simplicity was its strength, but its shutdown has created an urgent need for a more powerful, future-proof digital whiteboard for the classroom.
This guide doesn’t just show you how to use an interactive whiteboard with Gimkit; it provides a comprehensive migration guide focusing on the platforms that offer the best integration potential and the richest feature sets for K-12 and higher education. We’re specifically focusing on how to achieve seamless Gimkit interactive whiteboard integration with the top contenders for maximizing the high-engagement learning experience.
The Power Duo Revisited: Gimkit & Your New Collaborative Workspace
Before diving into new tools, let’s affirm the core value proposition: Gamification plus collaboration is a pedagogical powerhouse. Pairing the real-time engagement of Gimkit with a flexible collaborative workspace maximizes student engagement and data collection.
Gimkit’s Strengths: The Gamification Engine
 Gimkit remains the best tool for:
- Fun Games & Getting Involved: Driving active learning strategies through competition, incentives, and instant feedback.
- Quick Help & Learning: Providing instant formative assessment data.
- Play Alone or with Teams: Offering flexibility for asynchronous learning or live class sessions.
The New Whiteboard’s Role: Visual Thinking & Real-Time Collaboration
Your new digital whiteboard must go beyond Jamboard’s basic sticky notes. It must handle:
- Visual Learning and Concept Mapping: Allowing students to use drawing tools, mind maps, and image uploads to represent complex ideas.
- Real-Time Collaboration: Supporting true group work where multiple students contribute simultaneously without lag. Research has indicated that technology-enhanced learning environments can significantly improve collaboration and student focus.
- Workflow Integration: Offering embed options or robust APIs to ensure a seamless EdTech ecosystem.
When you mix Gimkit’s energy with the enhanced capabilities of modern whiteboards, you create a truly interactive learning whiteboard integration.
Jamboard Alternatives for Teachers – Top 3 Whiteboards for Gimkit Integration
The highest-volume searches today are for alternatives. We must address this head-on. The ideal replacement allows for quick link sharing, embedding, and visual note-taking that leads into a Gimkit game. If you’re looking at broader market options, you should also compare these tools with FigJam, Miro, and others.
1. FigJam: The Designer’s Choice
 FigJam, by the creators of Figma, is a leading contender for Jamboard replacement for teachers 2025. For educators, getting FigJam for Education typically provides free access to advanced features, making it a powerful replacement.
2. Miro: The Enterprise Solution
 Miro is a powerful, vast collaborative workspace, and teachers should explore Miro’s free Educational plan which includes unlimited active boards and premium features for verified educators.
| Feature | Gimkit Integration Score | Miro Classroom Activities Benefit |
| Ease of Use | 🟡 (Medium) | Steeper learning curve than Jamboard, but rewards the effort. |
| Gimkit Link/Embed | 🟢 (Very High) | Excellent embedding capabilities for external apps (check current Gimkit embed support). Great for complex workflows. |
| Collaboration | 🟢 (Very High) | Best for large-scale projects, asynchronous learning, and high-level visual thinking. |
| Best For | High School/College, Project-Based Learning, Complex Data Visualization |
3. Lucidspark: The Flowchart Specialist
 Lucidspark is highly focused on flowcharts and team alignment, making it perfect for structured projects.
How to Combine Gimkit and Digital Whiteboard Apps: A Seamless Teaching Workflow
Regardless of which Jamboard alternative for teachers you choose (FigJam, Miro, etc.), the core steps for successful Gimkit integration remain the same.
Step 1: Identify the Pedagogical Link
 When planning the transition from whiteboard to game, you should always incorporate real-time collaboration elements.
Step 2: Prepare Your Whiteboard Template
 Create a new board in your chosen platform (FigJam, Miro, etc.). Design it with clear, segmented areas. To set up your template effectively, you need to be familiar with what are the main features of Gimkit that you want to integrate.
Step 3: Implement the Gimkit Integration
 This is the most crucial technical step to achieve Gimkit interactive whiteboard integration.
A. The Direct Link Method (Easiest)
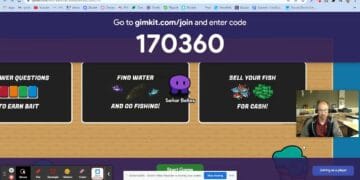
- In Gimkit, set your game (e.g.,
Classic Mode) to “Assignment” or “Live Game.” - Copy the resulting URL or download the QR code. Remember that this URL is what generates the Gimkit Join Code for students.
B. The Embedded Visual Method (Highest Integration)
If the whiteboard platform supports full embed of external iframes:
- Use a screenshot of the first Gimkit question and place it on the board.
- Have students answer on the board (using drawings/text).
- Then, use the embed function to place the actual live Gimkit game directly onto a separate frame of your digital whiteboard, offering a truly seamless teaching experience. The most current instructions for hosting a game and sharing kits can always be found in the Gimkit official help center documentation.
Tips for High-Value EdTech Integration
- Embrace the Migration Mindset: Always speak to the urgency of the Jamboard shutdown. While the shutdown is complete, you should check for new announcements about other EdTech tools in our upcoming Gimkit updates.
- Cite Expert Recommendations: When discussing alternatives, remember that major organizations (like Google itself) recommend these tools.
- Future-Proof Your Workflow: If this whole process seems tedious, remember that setting up one system and then letting it run is the key. Learning how to automate Gimkit workflows with Zapier can save you even more time later, addressing the high-level need for EdTech ecosystem efficiency.
Conclusion
Mixing Gimkit and a modern digital whiteboard is the perfect solution for teachers facing the Jamboard transition. By strategically combining visual planning and gamified assessment, you create a truly interactive and effective classroom environment that is prepared for the future of learning.


